Light has the greatest impact in photography. In this project, i will demonstrate effect of light on my photographs. I will take pictures at different times of the day and see the effects. As Photographers we know that the best images are the ones shot in the early mornings and late evenings when the sun is not too harsh. By midday when the sun is overhead, light becomes too harsh and does not give us very good pictures. So we see that shooting in the best light can disrupt normal schedules.
To be a successful photographer, you need to understand how the different elements of aperture, shutter speed and ISO combine to produce balanced exposures. But as an amateur photographer, i have made effort also to understand my camera and how it works . This is very important. A successful photographer needs the eyes to see what others can and as well use his tools to capture his art or images.
The concepts of aperture, shutter speed and ISO need good understanding. When i started out they seemed quite confusing but as i read the more i began to understand. What sets a good professional photographer part is his or her ability to adapt these settings when taking pictures to produce excellent images.
In " Understanding exposures, third edition by Bryan Peterson, p 16, a correct exposure is defined as a simple combination of the three important factors of aperture, shutter speed and ISO. These same factors have always been at the heart of every exposure whether that exposure was correct or not. So put another way exposure to LIGHT is determined by these three factors.
In my OCA reference manual on page 106, its mentioned that the amount of light determines how a photograph can be taken and even whether it can. Camera sensors are designed to work optimally in normal daylight, just as are most films. We are told that the quality of light can also make an essential difference to a picture being often the one element that can change significantly in a view.
I chose a pool side to demonstrate this at noon when the light was already hash and the sun was at highest inclination
 |
| Image 2: ISO 100,50MM, 0 EV, F/5, 1/640 |
 |
| Image 1: ISO 100,50MM, 0 EV, F/5, 1/320 |
 |
| Image 3: ISO 100,50MM, 0 EV, F/5, 1/1250 |
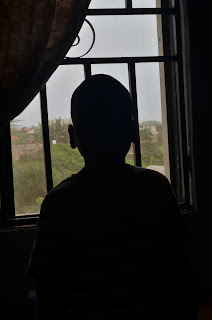
Silhouette images i find very appealing. I learnt to take silhouettes at the London school of Photography when i attended a five day program in April 2011. The course was to basically expose me to the rudiments of my new DSLR the nikon D7000. You set the light meter on the camera to zero against an illuminated background and then focus on the subject and shoot. I tried taking a picture of my son in front of a window.
The light meter takes the reading outside and when the camera is re-oriented, the sensors pick -up the in metered part of the image resulting in the image above. The the green foliage behind which contrasts sharply with the young mans dark outline. Am still practicing to take silhouettes in unconfined spaces.
 |
| Image 5:ISO 200 ,50MM, 0 EV, F/16,1/15 |
 |
| Image 6: ISO 200, 50MM,0 EV, F/16, 1/15 |

No comments:
Post a Comment