For the assignment am going to put the different lighting skills I have learnt in this exercise to effective use. The idea is to use this knowledge to bring out particular physical properties of the same object. I will aim to show the following qualities by means of lightening.
1.Shape, quality which has to do with the outline of an object-its edges which are likely to stand out more clearly if they contrast with the background.
2.Form or how 3 -dimensional an object looks.
3.Texture, a quality of the surface detail
4. Colour
A challenge here was to figure out what to photograph to achieve the expected results. I finally settled on two flower vases which i purchased specially for the exercise. My own objectives during the asignment are:
1. To apply tutor feedback in the assignments and demonstrate in practical terms what i have learnt.
2.To learn from my mistakes and be as self-critical as i can be to improve on my photography.
3. Continue to learn from the works of other photographers , research and read as many books as I can.
It is always good in photography to keep it simple just as in writing. More of the juice tends to flow out and thats what i have done.
SHAPE:
To demonstrate this, I knew that the background had to be simple and contrast with the colours of the object. So i took some pictures but most of the time realised that i was not happy with my composition. My tutor has talked about this about two occasions and i really did not want him to talk about it again. Therefore for the assignments I was particularly mindful of my composition.
To get the shape out , i reasoned that having the blue sky as a background would be a good idea. So i searched around and found a suitable place to take the photograph.
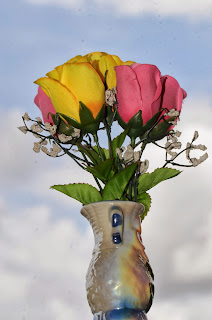 |
| Image 1:ISO 125, 105mm,0ev, f/14,1/160, With Flash |
This picture was taken using my nikon macro lens 105mm F 2.8 and flash. I think that the background has brought out the shapes of the flower and the vase. But i still used a lower shutter speed to see how the blue in the background will turn out. It was an overcast day with lots of clouds.
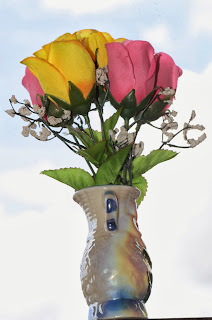 |
| Image 2:ISO 125, 105MM, 0EV,F/14,1/60s, Nikon 910 speed-light |
In natural light complimented by the flash at 1/60s, the blue sky is not as saturated. But am pleased with the images because they have brought out the flower and the vase which contrast with the sky.
The color of the subject will depend on lighting and background as well as the lenses resolving power. Fortunately I think this macro lens could do justice to that. So I moved closer to the flower taking note of the background and the light. Natural light with flash light. I reduced the power of the flash and took the photograph below.
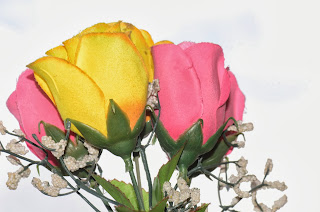 |
| Image 3:ISO 125,105MM,0EV, F/14,1/60, Nikon speed-light |
I wanted to use a natural flower to depict this . So I went outdoors to look for something that can give me that strong color. It was 8.52am and the light was still good.
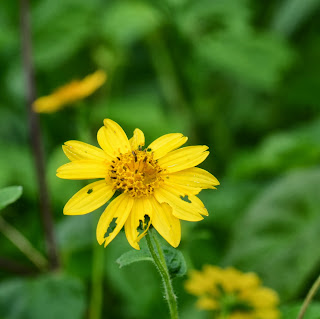 |
| Image 4:ISO 100,105MM,0EV,F/10,1/60, Nikon speedlight |
The sunflower shown above contrasts strongly with the green background thereby bringing out the colour.It is interesting because of the little story it tells that some insects have bit on it. There is colour harmony between the yellow and the green.
"Harmony is defined as something that is pleasing to the eye in visual experiences. When something is not harmonious, its either boring or chaotic. At one extreme is a visual experience that is so bland that the viewer is not engaged. The human brain will reject under-stimulating information.At the other extreme is a visual experience that is so overdone, so chaotic that the viewer can't stand to look at it.The human brain rejects what it can not recognize, what it can not organize, what it can not understand. The visual task requires tht we present a logical structure. Colour harmony delivers visual interest and a sense of order."(www.colormatters.com)"
SOME THOUGHTS AND OBSERVATIONS
One way I thought the colours could be depicted in greater detail was by using a purely black ground. So I attempted to isolate the subject by manipulating the ambient light. Bryan Peterson in "Understanding Flash Photography" explains how this can be achieved. I followed how he did it but ended up not getting a completely black background. There is something obviously that am not doing correctly. Take a look:
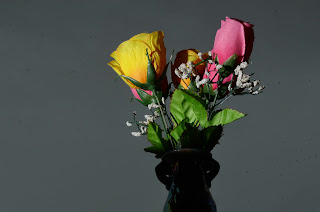 |
| Image 5:ISO 200,105mm,0ev, f/16,1/320s |
FORM
Form is what adds the third dimension to an object. The shape is two dimensional. To bring out the form of this object, I needed to depict it in silhouette form which is what will likely bring out the shadow against a clear distinct background. I aimed at the rather cloudy blue sky and set my camera light meter to zero and then re-composed the image while locking focus, to produce a silhouette of the flower and vase. I think it has kind of brought out the form when viewed against the white sky background.
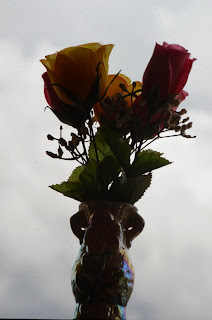 |
| Image 6:ISO 800,105MM,F/14,1/1250 |
The above picture was at ISO 800. I was not too satisfied with it so i lowered to ISO 100 , recomposed and took the picture again to see how it would look like.
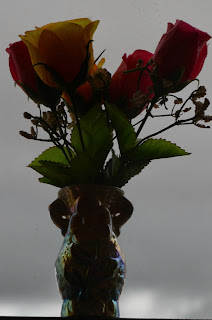 |
| Image 7: ISO 100,105MM,0EV,F/14,1/80 |
Image 7 above brought out the form better i thought.
TEXTURE
Texture is a quality of the surface detail And fine details stands out best with a pattern of small ,hard shadows.
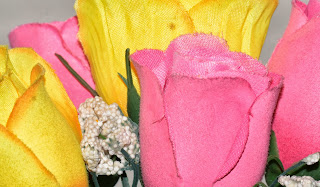 |
| Image 8:Texture, ISO 125,105MM,F/14,1/80s |
In Geology we often talk about rock texture which could be coarse-grained, glassy or fine-grained. Used effectively, they can be impressive elements of composition. They can also have the strength to hold a viewer to the photograph as he studies it. (Art of Photography, Barnbaum, Bruce, 2010, p.42)
I have attempted to show the texture of the artificial flower used in this exercise. Viewed in normal size, it could be mistaken as a normal flower but on closer examination, the texture reveals the artificiality.
The noted photographer Frederick Sommer cautions that textural studies alone fall flat. He points out that texture is a surface quality and if the photograph fails to delve beneath the surface to uncover inner truths or ask probing questions, we end up with a print as superficial as the texture.
CONCLUSIONS
This exercise on light has been the most challenging. But it has also been interesting. Learning photography requires practice and patience. The exercises have equipped me with knowledge that will enhance my creativity. I have learnt the following:
1. Natural and artificial light, intensity of light
2. Measuring the brightness of light, using matrix, center weighted and spot metering effects on photographs.
3. Exposures, ISO, shutter speed and aperture effects on light and light distribution in an image.
4. The colours of light, white balance, colour temperatures and how they affect the picture.
5. Use of the Flash in flash photography and knowing aperture and shutter speeds effect on flash photography, flash to subject distance,
6. Use of diffusers and reflectors in photography. Contrasts and shadow fill.
7. Use of available light indoors and outdoors.
8.Night photography
9.Application of lighting techniques in different settings.
I will now send this work to my tutor in Barnsley and await his feedback on how i can improve. Am ready to proceed to the last exercise which is Narrative. Its been worthwhile and I truly enjoyed it. Will keep improving affter this .