22 October 2011

CROPPING AND EXTENDING

Fig 1

Fig 1:cropped

Fig 2

Fig 2:cropped

Fig 3

Fig 3: Cropped
Cropping is a convenient way to edit pictures. You cut out segments that are,nt needed. It is also a way of zooming into a subject taken from a far distance though this comes with the resultant loss in image quality and sharpness depending on the lens quality.If all lenses were infinitely sharp and films were grainless or if there were an infinite number of pixels on camera sensors, we could easily get by with one wide angle lens and just crop to the image we really want. Unfortunately we do not have that luxury.(Bruce Barnhaum; The art of Photography, 2010). The image in Fig 1 was taken along a countryside road. I loved how  the road sliced through the dense vegetation.  By cropping it in Fig 2 I was able to cut off the sky and zoom closer to the cyclist seen at a far distance.
In Fig 2 I have cut the foreground and got a rather narrow view of the background. Fig 3 is an angular birds eye shot of kids in a swimming pool. By cropping this picture, I have narrowed down the view to only four kids inside the water. Someone seeing the cropped picture only would have no idea about othersin the pool but not shown in the picture.

LESSONS LEARNT:
1. Cropping a picture in digital format gets rid of unwanted areas of a picture.
2. Cropping enables the subject to appear closer in a picture but sometimes with a loss in image sharpness.
3. Cropping also alters the visual perspective of an image.
4. It is generally a convenient editing tool.

VERTICAL AND HORIZONTAL FRAMES

For this exercise , i went out to see what images i can make of vertical and horizontal shots. What i did was to take vertical and horizontal shot of each subject.


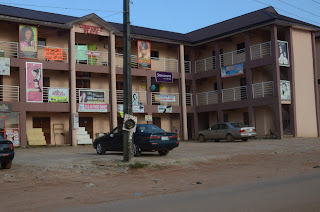
Fig 1: Shopping Complex
 
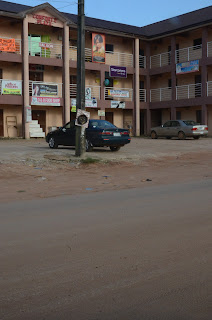
Fig 2: Shopping complex

For this exercise , i went out to see what images i can make of vertical and horizontal shots. What i did was to take vertical and horizontal shot of each subject.

Fig 3: Palm tree

Fig 4:Palm tree

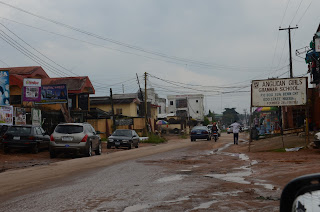
Fig 5: Road in Benin city
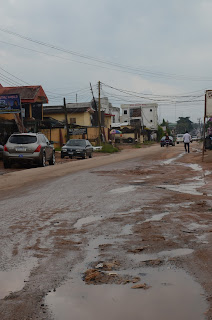
Fig 6: Road

Fig 7: Residential complex


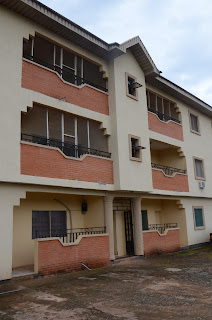
Fig 8:Residential complex, vertical

Fig 9; Uncompleted building

Fig 10:Uncompleted building


Fig 11:Line of palm trees

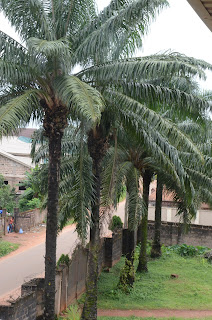
Fig 12: Line of palm trees


Fig 13


Fig 14


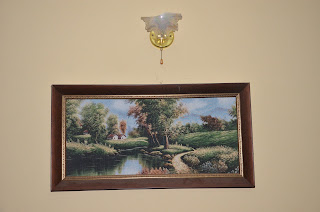
Fig 15: Painting on the wall

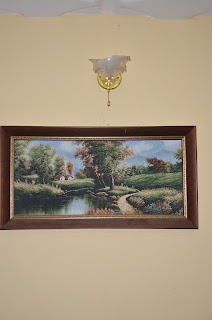
Fig 16: Painting on the wall


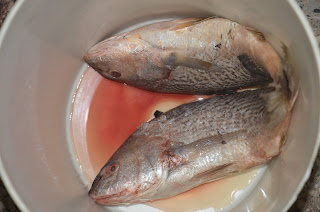
Fig 17: Fish: Vertical


Fig 18:Fish, Horizontal


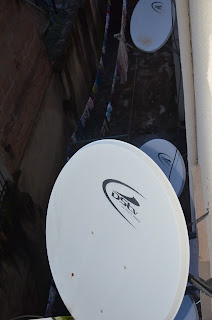
Fig 19: Satellite dish


Fig 20: Satellite dish
 There tends to be some differences in perspectives in vertical and horizontal frrames. The horizontal frame absorps more of an area. I tend to think that vertical shots are very good for portrait pictures. In some instances though with my lens zoomed in and very close to the subject, you need to look very well to observe the difference in the vertical and horizontal shots as in the image of the fish in Figs 17 and 18.

Horizontal frames seem to flow more naturally with the eye. In the Photographers Eye, it says our natural view of the world is binocular, so a horizontal picture format seems entirely normal. The horizontal frame influences the composition of an image, but not in an insistent outstanding way. It conforms to the horizon, and so to most overall landscapes and general views. (Michael Freeman, 2007).

For naturally vertical subjects, the elongation of a 2:3 frame is an advantage and the human figure, standing is the most commonly found vertical subject. (Michael Freeman , 2007). The image of the woman in dark dress in Fig 14 illustrates vertical effect on portrait.


16 October 2011

POSITIONING THE HORIZON

For this exercise, two things or maybe three worked against me. One was the weather which was foggy when I went to shoot. The other was the difficulty securing a vantage point to take a picture of the ancient city of Benin in mid western Nigeria. And the third was either my inability to fully understand my Camera controls or the quality of my Lens. I  was not satisfied with the quality of the pictures. However for purposes of illustration, they are presented as shot.

Though it is said that it is not the equipment that takes good pictures but the imagination of the photographer, i believe that the quality of equipment determines to a considerable degree how a picture comes out. That is why i feel there is need to invest in better photo gear even though am only a serious enthusiast. Maybe when i do that coupled with my OCA learning, then i will start to feel good about myself. Right now am still struggling.


Fig 1: Low Horizon
 
Fig 2: Higher Horizon

Fig 3: Lower Horizon


Fig 4: Centered Horizon
From the images i have arranged, I am  more drawn to the image in  Fig1. The viewb of the city set against the skyline tends to draw my eye. Because there really was,nt any distinct features in the foreground except for some boring banana leaves, I think if the image in Fig 1 had better optical resolution, it would have been quite appealing. The most common photographic situation in which the frame must be divided cleanly and precisely is the one that includes the horizon line.(Michael Freeman, 2007).

15 October 2011

DIVIDING THE FRAME

BALANCE

Balance is at the heart of composition. True a good picture needs to have balance. Thats what i am trying to learn in this exercise. Balance is the resolution of tension, opposing forces that are matched to provide equilibrium and a sense of harmony. Its a fundamental principle of visual perception. (Michael Freeman, The photographers eye, 2007).

As i try to improve on my photography, this concept is one that i need to grasp well to be able to produce appealing pictures. In the last week i have read some books aimed at explaining elements of design.

1.The art of photography by bruce Barn baum
2. The Photographers Eye , by Michael Freeman.

By understanding these elements of design and applying them to my pictures, i reckon my photography well improve in leaps and bounce over the coming years.


fig 1


fig 2


fig 3


Fig 4


Fig 5


Fig 6


In Fig 1  the christmas trees have filled up about

09 October 2011

FOCAL LENGTH AND DIFFERENT VIEWPOINTS

So far I have been able to reflect on the exercises done so far. I have learnt quite a bit even though am just starting. Its interesting to see how perspectives do indeed affect an image.
In this exercise on focal lengths and different perspectives, i was struck to see that distance and focal lenghts do play a significant role in the final image impression. I took two pictures of the car. The first shot using my 18-105mm lens was at 105mm all zoomed in at maximum focal length as shown below.

  Observe the image very well and compare it to the 2nd image shot at very wide angle 18mm. I moved closer and closer until I filled the frame taking note of the edges in the first image. The 2nd image is shown below.


What was not captured in the first image is shown in the 2nd image;the surroundings.The angle of view has also increased making the roof more visible now.

The Photographers Eye (Michael Freeman, 2007)  discusses perspective as the appearance of objects in space, and their relationship to each other and the viewer. A heigthened sense of depth through strong perspective tends to improve the viewers sense of being there in front of a real scene. It makes more of the representational qualities of the subject, and less of the graphic structure.

Looking at the two images, I tend to prefer the second image because i think its stronger. it is more representative of the environment.

LESSON LEARNT: Perspectives and viewpoints strongly affect the message of the image.


03 October 2011

VARIABLE FOCAL LENGTHS

This exercise was to show the effect of changing focal lengths . I used my 18-105mm lens to focus on a two story buiilding some 600 or 700 feet away. I have earlier read Michael freemans The photographers eyes on his discussion on the topic and filling the frame of the viewfinder. A  wide angle lens enhances linear perspective if used close to the nearest parts of the scene and can show a large foreground-to-distance ratio. A telephoto lens compresses these planes reducing linear perspectiv, if used from a distance.This weakens perspective (Michael freeman, 2007).


Fig 1: Shutter speed 1/3000s, Aperture F/9.5, Focal length 18mm
The Fig 1 above was shot with the lens set at 18mm widest angle. The two story building in the background appears distant with a large part of the area shown to the left and right of the frame.

Fig 2: Shutter speed 1/6000s, Aperture F/5.6, Focal length 32mm
At focal length of 32mm, the two -storey building begins to come more into focus. But the angle of view begins to increase. Notice that the wall in Fig 1 is no longer visible.

Fig 3: Shutter speed 1/6000s, Aperture F/5.6, Focal length 42mm


Fig 4: Shutter speed 1/6000s. Aperture F/5.6, Focal length 48mm
Fig 4 was shot at a focal ength of 48mm. . Notice the increasing angle of view with overhead tanks no longer in view.

Fig 5: Shutter speed 1/6000s, Aperture F/5.6, Focal length 62mm
 I am using an APC sensor camera with a focal length magnification of 1.5. This implies that the actual focal lengths should be x1.5. In the image above actual focal length is 62x1.5=93mm.


Fig 6: Shutter speed 1/6000s, Aperture F/5.6, Focal Length 80mm

Fig 7: Shutter speed 1/6000s, Aperture F5.6, Focal Length 92mm


Fig 8:Shutter speed 1/6000s, Aperture F/5.6, Focal Length 105mm
 The image 8 above was the maximum focal length achieved with my lens. But the difference in perspectives between the first and last images can be seen. In this last image , the storey building is clearly conspicious .

02 October 2011

SEQUENCE OF COMPOSITION


Fig 1: Starting Point


The exercise on sequence of composition proved a bit challenging in the sense that i wanted to get a scenery or event that would best portray sequences. I ended up in the recreational park in benin city. Its a sunday morning and few people were at the park as compared to the previous day when Nigeria celebrated its 51st independence anniversary and the place was crowded with people, Though i took pictures on that day, i did not think they would best describe a sequence. One thing I have learnt about Photography is that you need to be prepared for any event you want to cover. If you go for an event with a telephoto lens instead of a wide -angle lens that would best serve the purpose, then you mess up the whole project. Thats what happened to me. I went for the celebration with my 70-300mm telephoto lense instead of using my taking along my 18-105mm wide angle lens. Then i discovered at that point that I could not get shots with subjects very close by and cover the area very well.
All said Fig 1 was the day after with my wide angle lens. This was my approach towards the refreshment area with my son in tow.
Fig 2: Moving towards the white chairs under the tree


Fig 3: More to the right

Fig 4:Walking towards the chairs


Fig 5: And closer

Fig 6: My son heading towards the sitting area
 In Fig 6, my son heads towards the sitting area oblivious that the path is muddy. He steps in and stains his white trousers, itching to have a drink. I used a  faster shutter speed of 1/3000s which explains why the shadow is prominent. I need to do a better job of my apertures and shutter speed settings


Fig 7: He turned back due to the mud.

Fig 8


Fig 9: The Attendant is tidying up with his back to us.


Fig 10: Oblivious of our presence as we approach


Fig 11: This is an outdoors bar.


Fig 12: At this point he sees us as I take his photograph


Fig 13: We ordered drinks and he opens the refrigerator to give us our orders.


Fig 14: The fayrouz banner is clearly visible now. The assistant to the attendant is also busy cleaning up


Fig 15: Cleaning up

Fig 16: And more cleaning


Fig 17: We settle down on chairs provided and i take a close up shot of the fayrouz advert.

Fig 18: My son settles down to seep his drink.
In Fig 18, he is finally having a drink after wading through mud to get to the sitting area.
 
Fig 19: Drinking water before we make to leave.