08 December 2013

PART FIVE :NARRATIVE AND ILLUSTRATION

This is the final exercise and I truly want to give a good account of myself in this one. In this,  you are required to bring all that has been learnt into creating a narrative picture essay. This narrative is the major thrust in this exercise. Now I sat down to think of what I could do to clearly depict this. One scenario was to photograph a home activity for one day. The other is to go out to the market area and capture a trader or artisans activity for a full day. But either ways I want it to look great. I considered shooting in monochrome to see if it can make a difference.

The only way to catch up in photography is to practice regularly. Reading and following the works of other photographers is also very helpful. My tutor has been stressing that. I bought some books recently and have been reading them . In the process I discovered that my inability to source for these referenced books earlier has impacted on my learning. Not that I was not reading. I have been reading a lot, but some of these books in light would have been of immense help if I had read them earlier than now. Some of the books I am reading presently include the following:

1, Complete Digital Photography, Seventh edition by Ben Long.
2.Light Science & Magic, An introduction to Photographic Lighting, By Fil Hunter,Steven Biver and
   Paul Fuqua.
3.Flash Techniques for Macro and Close -up Photography, by Rod and Robin Deutcshman
4.Understanding Close-up Photography, By Bryan Peterson.

It is important to read as many books as possible because  authors tend to explain topics differently and a reader may end up not fully understanding the explanation of a topic in one book, but when he reads another book, the explanation sinks in immediately. A clear example in my case was when i was trying to take a picture with black background. Not until  I read flash techniques for Macro and close-up photography by  Rod and Robin Deutcshman did i fully understand the procedure.  To get a black background, you need to use your camera's smallest aperture, set it to the maximum flash sync speed which in this case was 1\250s and choose your lowest ISO. Then you manipulate the flash to subject distance and take the picture. The picture shown below was taken after I read this book and fully understood the technique.

Image 1:ISO 160,105MM,0EV,F/32, 1/250s
The above image is not what am expected to do in this exercise. I am only showing it to explain some of the things i have learnt in my journey through photography and why i should read widely.

Now back to this exercise. In Complete digital Photography by Ben Long (page 236), Narrative is defined as the process of telling a story. It goes further to explain that narrative is a fairly simple thing to understand when  you are writing or shooting video because there is a temporal component that you can control. Consequently its possible to convey a series of events that have a beginning, middle and end. But in photography, narrative can be a bit more ephemeral.

When trying to construct a photographic narrative, its important to think about what information is required to tell your story.THE viewer will project a lot of information into the scene. As a photographer , you can use the viewers automatic projections to build a story, as long as you give them enough clues to point them in the right direction. But we are advised not to expect that every single image can convey an entire narrative. If we do this, we will be more prone to wide shots that lack an obvious subject. Sometimes one can get a narrative shot, while at other times, one has to rely on good single images that build up a narrative. At still other times, narrative is simply not an issue. Some scenes are purely attractive for their visual qualities.


TUTUOR FEEDBACK

I submitted my work in November 2013 for the exercise on light. Unfortunately the tutor was not really impressed with the assignment. He however commended my learning log which he described as very good. He went on to say that its a bit of a mystery tone why there is such gap between my work on the learning log and interpretation of the brief.  This assessment got me thinking where am I going wrong?

So I sat down, re-printed all the assessments and reviewed them again by following all my entries in the learning log. I discovered that not proper attention is placed on the assignments as against entries in the learning log. This has to change moving forward. Like I told him, the degree is the motivation for my taking this course and i intend to forge ahead despite the odds. The last exercise is on narrative and illustration and i will give a good account of myself.

19 July 2013

ASSIGNMENT 4: APPLYING LIGHTING TECHNIQUES

INTRODUCTION

For the assignment  am going to put the different lighting skills I have learnt in this exercise  to effective use. The idea is to use this knowledge to bring out particular physical properties of the same object. I will aim to show the following qualities by means of lightening.

1.Shape, quality which has to do with the outline of an object-its edges which are likely to stand out more clearly if they contrast with the background.

2.Form or how 3 -dimensional an object looks.

3.Texture, a quality of the surface detail

4. Colour

A challenge here was to figure out what to photograph to achieve the expected results. I finally settled on two flower vases which i purchased specially for the exercise.  My own objectives during the asignment are:

1. To apply tutor feedback in the assignments and demonstrate in practical terms what i have learnt.
2.To learn from my mistakes and be as self-critical as i can be to improve on my photography.
3. Continue to learn from the works of other photographers , research and read as many books as I can.


It is always good in photography to keep it simple just as in writing. More of the juice tends to flow out and thats what i have done.

SHAPE:
To demonstrate this, I knew that the background had to be simple and contrast with the colours of the object. So i took some pictures but most of the time realised that i was not happy with my composition. My tutor has talked about this about two occasions and i really did not want him to talk about it again. Therefore for the assignments I was particularly mindful of my composition.

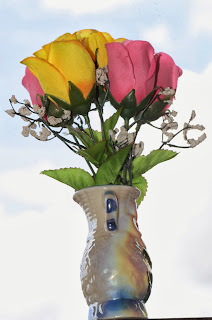
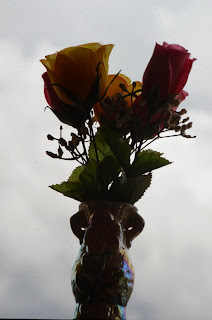
To get the shape out , i reasoned that having the blue sky as a background would be a good idea. So i searched around and found a suitable place to take the photograph.


Image 1:ISO 125, 105mm,0ev, f/14,1/160, With Flash

This picture was taken using my nikon macro lens 105mm F 2.8 and flash. I think that the background has brought out the shapes of the flower and the vase. But i still used a lower shutter speed to see how the blue in the background will turn out. It was an overcast day with lots of clouds.


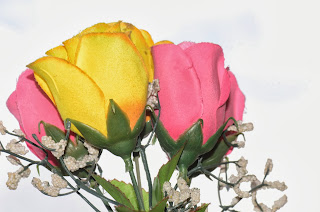
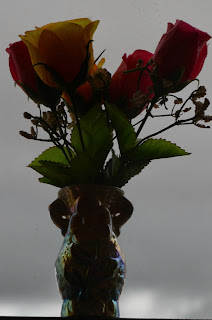
Image 2:ISO 125, 105MM, 0EV,F/14,1/60s, Nikon 910 speed-light

In natural light complimented by the flash at 1/60s, the blue sky is not as saturated. But am pleased with the images because they have brought out the flower and the vase which contrast with the sky.

COLOUR:

The color of the subject will depend on lighting and background as well as the lenses resolving power. Fortunately I think this macro lens could do justice to that.  So I moved closer to the flower taking note of the background and the light. Natural light with flash light. I reduced the power of the flash and took the photograph below.

Image 3:ISO 125,105MM,0EV, F/14,1/60, Nikon speed-light


I wanted to use a natural flower to depict this . So I went outdoors to look for something that can give me that strong color. It was 8.52am and the light was still good.


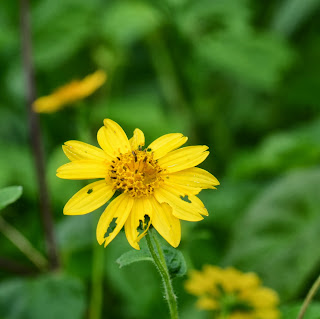
Image 4:ISO 100,105MM,0EV,F/10,1/60, Nikon speedlight

The sunflower shown above contrasts strongly with the green background thereby bringing out the colour.It is interesting because of the little story it tells that some insects have bit on it. There is colour harmony between the yellow and the green.

"Harmony is defined as something that is pleasing to the eye in visual experiences. When something is not harmonious, its either boring or chaotic. At one extreme is a visual experience that is so bland that the viewer is not engaged. The human brain will reject under-stimulating information.At the other extreme is a visual experience that is so overdone, so chaotic that the viewer can't stand to look at it.The human brain rejects what it can not recognize, what it can not organize, what it can not understand. The visual task requires tht we present a logical structure. Colour harmony delivers visual interest and a sense of order."(www.colormatters.com)"

SOME THOUGHTS AND OBSERVATIONS

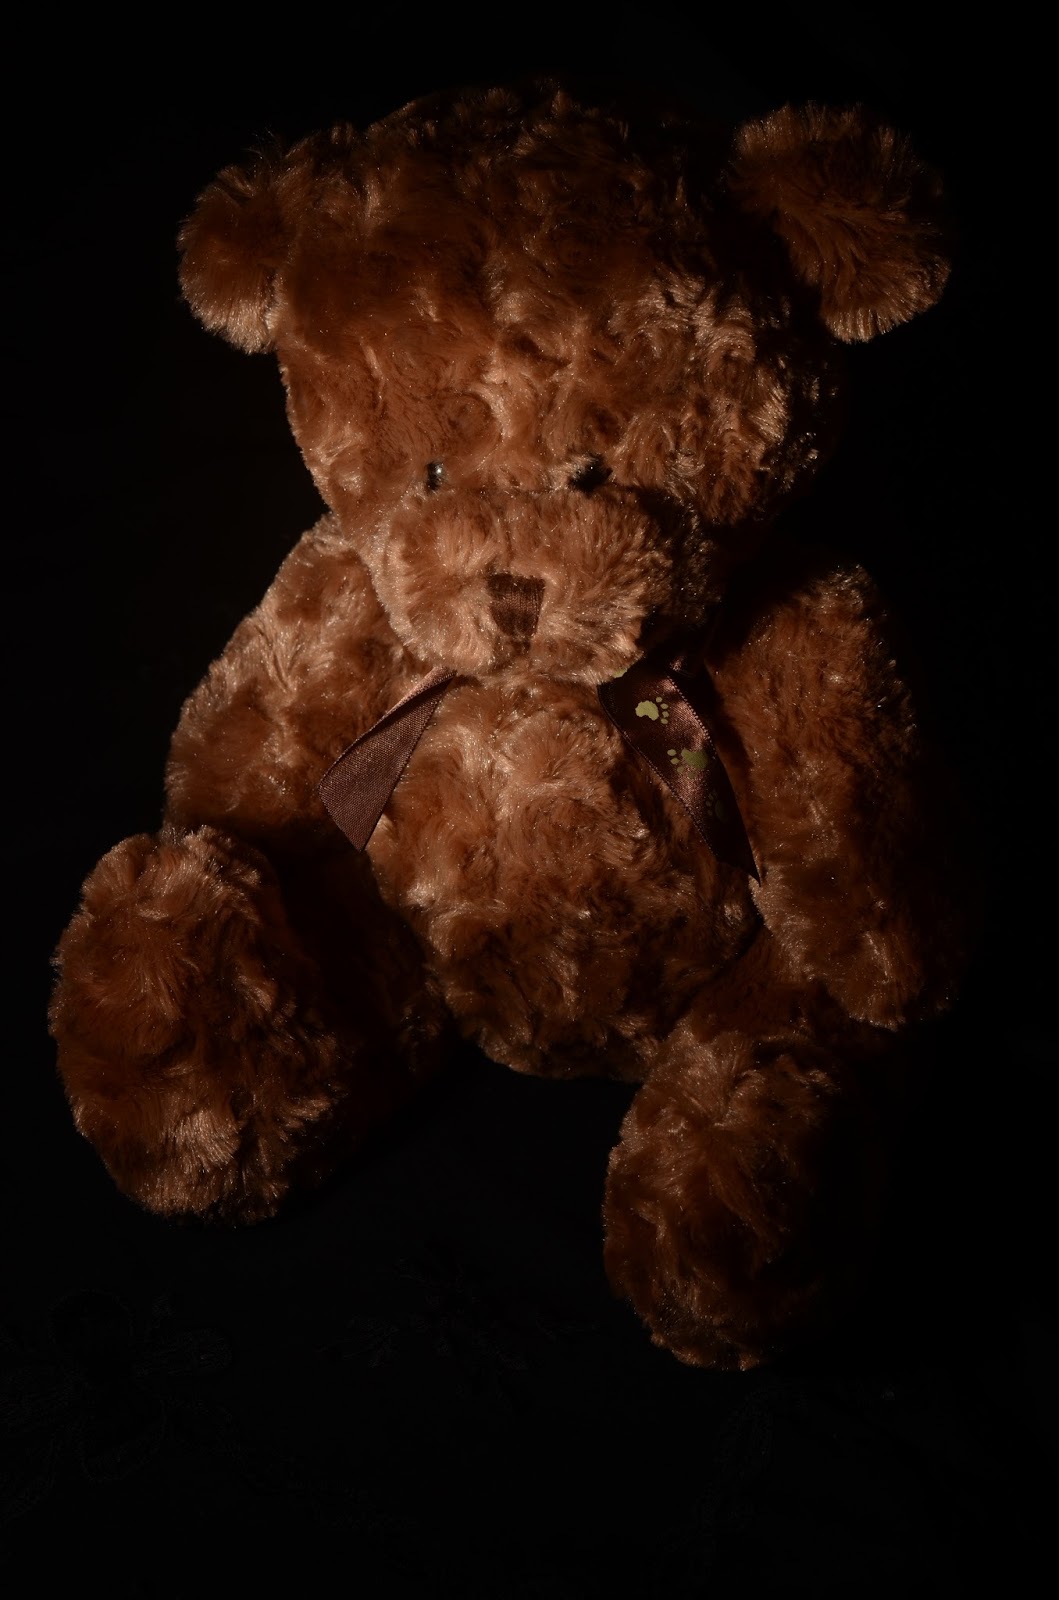
One way I thought the colours could be depicted in greater detail was by using a purely black ground. So I attempted to isolate the subject by manipulating the ambient light. Bryan Peterson in "Understanding Flash Photography" explains how this can be achieved. I followed how he did it but ended up not getting a completely black background. There is something obviously that am not doing correctly. Take a look:

Image 5:ISO 200,105mm,0ev, f/16,1/320s
The ambient light was balanced on my light meter at f/16, 1/60s and ISO 200. And the idea was to cut out ambient light by significantly increasing the shutter speed and properly estimating the flash to subject distance. I will need to continue practicing this until I achieve the completely black background with subject standing out. Following the works of Michael Malloy as recommended by my tutor, I found that he has used this technique pleasingly in his product and portrait photography.


FORM

Form is what adds the third dimension to an object. The shape is two dimensional. To bring out the form of this object, I needed to depict it in silhouette form which is what will likely bring out the shadow against a clear distinct background. I aimed at the rather cloudy blue sky and set my camera light meter to zero and then re-composed the image while locking focus, to produce a silhouette of the flower and vase. I think it has kind of brought out the form when viewed  against the white sky background.


Image 6:ISO 800,105MM,F/14,1/1250

The above picture was at ISO 800. I was not too satisfied with it so i lowered to ISO 100 , recomposed and took the picture again to see how it would look like.


Image 7: ISO 100,105MM,0EV,F/14,1/80

Image 7 above brought out the form better i thought.


TEXTURE

Texture is a quality of the surface detail And fine details stands out best with a pattern of small ,hard shadows.


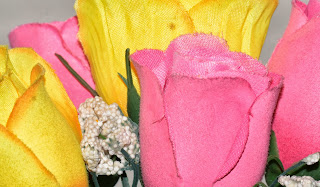
Image 8:Texture, ISO 125,105MM,F/14,1/80s
This cropped version of the image is to demonstrate texture. Texture is often overlooked as an element of composition. It can be a compelling visual treat.(Art of Photography, Barnbaum, Bruce, 2010, P 42).
In Geology we often talk about rock texture which could be coarse-grained, glassy or fine-grained. Used effectively, they can be impressive elements of composition. They can also have the strength to hold a viewer to the photograph as he studies it. (Art of Photography, Barnbaum, Bruce, 2010, p.42)


I have attempted to show the texture of the artificial flower used in this exercise. Viewed in normal size, it could be mistaken as a normal flower but on closer examination, the texture reveals the artificiality.

The noted photographer Frederick Sommer cautions that textural studies alone fall flat. He points out that texture is a surface quality and if the photograph fails to delve beneath the surface to uncover inner truths or ask probing questions, we end up with a print as superficial as the texture.


CONCLUSIONS

This exercise on light has been the most challenging. But it has also been interesting. Learning photography requires practice and patience. The exercises have equipped me with knowledge that will enhance my creativity. I have learnt the following:

1. Natural and artificial light, intensity of light
2. Measuring the brightness of light, using matrix, center weighted and spot metering effects on photographs.
3. Exposures, ISO, shutter speed and aperture effects on light and light distribution in an image.
4. The colours of light, white balance, colour temperatures and how they affect the picture.
5. Use of the Flash in flash photography and knowing aperture and shutter speeds effect on flash photography, flash to subject distance,
6. Use of diffusers and reflectors in photography. Contrasts and shadow fill.
7. Use of available light indoors and outdoors.
8.Night photography
9.Application of lighting techniques in different settings.

I will now send this work to my tutor in Barnsley and await his feedback on how i can improve. Am ready to proceed to the last exercise which is Narrative. Its been worthwhile and I truly enjoyed it. Will keep improving affter this .


30 June 2013

SHINY SURFACES

This is the last exercise before the assignments. Its been interesting so far and I believe what i have learnt will take me to the next level. For this exercise, we are to work with objects that reflect brightly. The idea is to see how it is working with such highly refelective surfaces and what can be done to minimize the unwanted effects.
I got some tracing paper, tape and a scissors for this exercise. I also had to browse through other students blogs to see their set-ups as the instruction in my manual did not seem clear enough. Its my recommendation that some of the instructions in subsequent manuals be backed up with pictures for ease of set-up.

I took a few pictures to show the difference a diffuser would make on highly reflective surfaces.

Image 1:Taken without diffuser. ISO 1250,105mm,f/11,1/6s
Image 2: With tracing paper ISO 1250,105MM,F/11,1/8s


Image 3: With Light at a different position, ISO 1250,105mm,f/11, 1/8s

Image 4: With Light at another position, ISO 1250,105mm,f/11, 1/8s


CONCLUSIONS
I have seen from this experiment that there was some difficulty loosing the reflection of the camera lens completely. I tried shooting from different angles and distances and got different results. It was not a verY perfect exercise but i perfectly understand that shiny surfaces present a unique problem when photographing them and something has to be placed in front of the object to absorb the reflection.


CONCENTRATING LIGHT

To concentrate light on an object, I used a snoot made out of card board paper. The aim of the exercise was to depict the image using a flash with snoot and diffuser and with a snoot without a diffuser. My speed light  Nikon 910 has an in-built diffuser than can be pulled out to cover the front of the flash. It indicated a flash to object distance of 2 feet with ISO 250 and aperture of f/16 to get a correct exposure. So i took the first picture without a snooth or diffuser as shown in Image 1 below:


Image 1: Flash without snooth and diffuser:ISO 250,70mm,f/8,1/250
By using a black background and fiddling with my ambient exposure manipulating shutter speed, I was able to achieve the black background. I now took another picture with the snoot and diffuser on the flash shown in image 2 below:


Image 2: Flash with snoot no diffuser:ISO 250,70mm,f/8,1/200


Image 3: Flash with snoot and diffuser:ISO 250,70mm,f/8,1/200
As can be observed, with the snoot only light is concentrated in the facial area of the teddy but with the snoot and the diffuser, the light is spread across the teddy. My flash power was 1/64 . That probably accounts for why the light is severly diminished in Image 3.


Image 4: Processed  image 3 in Iphoto

I tweaked image 3 a bit in Iphoto to lighten and increase the contrast a bit. This has made the image a  bit warmer and i seem to prefer it.

CONCLUSIONS:

I am beginning to feel a bit more in control of the exercises. Concentrating light in a dark background tends to give an image a more atmospheric look as earlier pointed out. However i seem to still struggle with how to achieve a dark background for the image without using any absorptive material. With constant practice, i will get it.

The built -in diffuser in my flash has worked quite well and am happy with the final image. The exercise has also enabled to manipulate my flash in manual mode. I believe the best way to utilize the capabilities of the flash is by using it in manual mode rather in iTTL mode which can sometimes introduce errors.


23 June 2013

CONTRAST AND SHADOW FILL


I have been reading up on exposures and flash photography of late. A very good knowledge of how my speed light works is important as well. So for this exercise on contrast and shadows, i bought some cardboard, aluminum foil and cellotape to set up the exercise. The flash light had to be about 2 to 3 feet away from the subject. So i used i/128 power of the speedlight which indicated an ISO of 500 with aperture of f/16 to get the required 2 to 3 feet flash to subject distance. Image 1 and 2 below show the set-up.

Image 1: Set-up for Contrast and Shadow fill exercise
Image 2: Aluminium foil wrapped on white cardboard.
Following the instructions from my manual i took about twelve exposures to illustrae Contrast and shadow fill. The effects of the light with and without the diffusers, with the white card board and aluminium foil as well as with the aluminium foil crumpled together is shown the these next photographs.

Image 3: Object without diffuser, ISO 500,50mm,rev,f/16,8.0s


Image 4:Object with diffuser, ISO 500,50mm,f/16,10s

The effect with and without the diffuser can be seen when the two images above are compared. Shadows and highlights are very obvious in image 3, but with the diffuser the light is spread more evenly reducing the contrast. The next five exposures were all taken same with image 4.


Image 5:Object with a diffuser,ISO 500,50mm,f/16,10s

Image 6:Object with a diffuser,ISO 500,50mm,f/16,10s

Image 7:Object with a diffuser,ISO 500,50mm,f/16,10s

Image 8:Object with a diffuser,ISO 500,50mm,f/16,10s

Image 9:Object with a diffuser,ISO 500,50mm,f/16,10s


After these exposures, I took the white cardboard and placed it three feet from the object on the oppsite side of the light and took the next picture.


Image 10:Object with White card three ft from the object on the opposite side,ISO 500,50mm,f/16,10

Image 11: Dull side of aluminium foil facing object:ISO 500,50mm,F/16,13s


Image 12: White card board 1.5 ft away from object:ISO 500,50mm,F/16,13s


Image 13: Shiny side of foil paper facing object:ISO 500,50mm,,F/16,13s

I
Image 14: Crumbled shiny side of foil paper facing object
This exercise has indeed shown to me how we can use reflectors and diffusers to control contrast and shadows. I have to admit prior to now I did not really have an idea of their functions anytime i visit a studio and see all the works. With a little more practice, I will be able to modify the light system in a studio. I know that that what i had to use was a bit limiting in some ways but nevertheless it opened me up to the diverse ways we can manipulate light to produce a visually appealing image.


CONCLUSIONS

1.The diffuser produces a softer light which reduces areas of high contrast on the image.
2.The shiny surface of reflectors make a difference when it is put on the opposite side of the subject/object from the light.
2.High Contrast tends to produce more evocative and atmospheric images.
3.


THE LIGHTING ANGLE

Having worked out a manageable system for diffusing the light, we are now told to experiment with using it from different directions.So went ahead to set up an arrangement experimenting with different objects. I finally settled with some nice vases in my living room to see the effect of diffused light at different angles.

Image 1:Light in front of subject,ISO 1000,50mm,f/11,8s with tripod
Image 1 above shows some shadows to the left even with the diffuser.

Image 2:Light to the right of subject,ISO 1000,50mm,f/11,8.0s with tripod

With the light to the right of subject, the shadows on the vases appear to be sharper at the edges. I used auto white balance throughout because when i attempted using flash white balance, the images appeared to tainted orange in color. Maybe the color of light in the interior affected the result.


Image 3:Light to the left of subject,ISO 1000,50mm,f/11,10s with tripod
Image 4: Light behind the subject, ISO 1000,0ev,f/11,4s,with tripod,

With the image 4, i was supposed to get a silhouette which did'nt turn out so. It may possibly due to the flash power which i set at 1/128 based on the aperture and ISO i was using. I would need some now explanation from my instructor to help me get better at this next time. I know that to achieve a silhouette, the light meter is balanced with the brighter light and and the camera  re-directed to the dark area and then shutter is pressed. Thats now i have achieved silhouette before. But this one proved to be more challenging.


Image 5: Light behind subject to the left,ISO 1000,50mm,0EV,f/11,5s, with tripod

Image 6: Light behind subject to the right, ISO 1000,50mm,0EV,f/11,5s, with  tripod


Image 7: Light behind subject right at 45 degrees, ISO 1000,50mm ,f/11, 5s, with tripod
Image 8: Light behind to the subjects left at 45 degrees, ISO 1000,50mm,f/11,3s, with tripod


Image 9:Subject to the left of camera with side light at 45 degree angle: ISO 1000,50mm,f/11,2s, with tripod


Image 10: Subject to the right of camera with light at 45 degrees to the right: ISO 1000,50mm,f/11,2.5 with tripod


Image 11:Subject with light overhead pointing downwards: ISO 1000,50mm,f/11,2s with tripod

Image 12: Subject with light overhead slightly in front: ISO 1000,50mm,f/11,2.0 with tripod


Image 13: Subject with light overhead, Slightly behind.ISO 1000, 50mm,f/11,2s with tripod