30 June 2013

SHINY SURFACES

This is the last exercise before the assignments. Its been interesting so far and I believe what i have learnt will take me to the next level. For this exercise, we are to work with objects that reflect brightly. The idea is to see how it is working with such highly refelective surfaces and what can be done to minimize the unwanted effects.
I got some tracing paper, tape and a scissors for this exercise. I also had to browse through other students blogs to see their set-ups as the instruction in my manual did not seem clear enough. Its my recommendation that some of the instructions in subsequent manuals be backed up with pictures for ease of set-up.

I took a few pictures to show the difference a diffuser would make on highly reflective surfaces.

Image 1:Taken without diffuser. ISO 1250,105mm,f/11,1/6s
Image 2: With tracing paper ISO 1250,105MM,F/11,1/8s


Image 3: With Light at a different position, ISO 1250,105mm,f/11, 1/8s

Image 4: With Light at another position, ISO 1250,105mm,f/11, 1/8s


CONCLUSIONS
I have seen from this experiment that there was some difficulty loosing the reflection of the camera lens completely. I tried shooting from different angles and distances and got different results. It was not a verY perfect exercise but i perfectly understand that shiny surfaces present a unique problem when photographing them and something has to be placed in front of the object to absorb the reflection.


CONCENTRATING LIGHT

To concentrate light on an object, I used a snoot made out of card board paper. The aim of the exercise was to depict the image using a flash with snoot and diffuser and with a snoot without a diffuser. My speed light  Nikon 910 has an in-built diffuser than can be pulled out to cover the front of the flash. It indicated a flash to object distance of 2 feet with ISO 250 and aperture of f/16 to get a correct exposure. So i took the first picture without a snooth or diffuser as shown in Image 1 below:


Image 1: Flash without snooth and diffuser:ISO 250,70mm,f/8,1/250
By using a black background and fiddling with my ambient exposure manipulating shutter speed, I was able to achieve the black background. I now took another picture with the snoot and diffuser on the flash shown in image 2 below:


Image 2: Flash with snoot no diffuser:ISO 250,70mm,f/8,1/200


Image 3: Flash with snoot and diffuser:ISO 250,70mm,f/8,1/200
As can be observed, with the snoot only light is concentrated in the facial area of the teddy but with the snoot and the diffuser, the light is spread across the teddy. My flash power was 1/64 . That probably accounts for why the light is severly diminished in Image 3.


Image 4: Processed  image 3 in Iphoto

I tweaked image 3 a bit in Iphoto to lighten and increase the contrast a bit. This has made the image a  bit warmer and i seem to prefer it.

CONCLUSIONS:

I am beginning to feel a bit more in control of the exercises. Concentrating light in a dark background tends to give an image a more atmospheric look as earlier pointed out. However i seem to still struggle with how to achieve a dark background for the image without using any absorptive material. With constant practice, i will get it.

The built -in diffuser in my flash has worked quite well and am happy with the final image. The exercise has also enabled to manipulate my flash in manual mode. I believe the best way to utilize the capabilities of the flash is by using it in manual mode rather in iTTL mode which can sometimes introduce errors.


23 June 2013

CONTRAST AND SHADOW FILL


I have been reading up on exposures and flash photography of late. A very good knowledge of how my speed light works is important as well. So for this exercise on contrast and shadows, i bought some cardboard, aluminum foil and cellotape to set up the exercise. The flash light had to be about 2 to 3 feet away from the subject. So i used i/128 power of the speedlight which indicated an ISO of 500 with aperture of f/16 to get the required 2 to 3 feet flash to subject distance. Image 1 and 2 below show the set-up.

Image 1: Set-up for Contrast and Shadow fill exercise
Image 2: Aluminium foil wrapped on white cardboard.
Following the instructions from my manual i took about twelve exposures to illustrae Contrast and shadow fill. The effects of the light with and without the diffusers, with the white card board and aluminium foil as well as with the aluminium foil crumpled together is shown the these next photographs.

Image 3: Object without diffuser, ISO 500,50mm,rev,f/16,8.0s


Image 4:Object with diffuser, ISO 500,50mm,f/16,10s

The effect with and without the diffuser can be seen when the two images above are compared. Shadows and highlights are very obvious in image 3, but with the diffuser the light is spread more evenly reducing the contrast. The next five exposures were all taken same with image 4.


Image 5:Object with a diffuser,ISO 500,50mm,f/16,10s

Image 6:Object with a diffuser,ISO 500,50mm,f/16,10s

Image 7:Object with a diffuser,ISO 500,50mm,f/16,10s

Image 8:Object with a diffuser,ISO 500,50mm,f/16,10s

Image 9:Object with a diffuser,ISO 500,50mm,f/16,10s


After these exposures, I took the white cardboard and placed it three feet from the object on the oppsite side of the light and took the next picture.


Image 10:Object with White card three ft from the object on the opposite side,ISO 500,50mm,f/16,10

Image 11: Dull side of aluminium foil facing object:ISO 500,50mm,F/16,13s


Image 12: White card board 1.5 ft away from object:ISO 500,50mm,F/16,13s


Image 13: Shiny side of foil paper facing object:ISO 500,50mm,,F/16,13s

I
Image 14: Crumbled shiny side of foil paper facing object
This exercise has indeed shown to me how we can use reflectors and diffusers to control contrast and shadows. I have to admit prior to now I did not really have an idea of their functions anytime i visit a studio and see all the works. With a little more practice, I will be able to modify the light system in a studio. I know that that what i had to use was a bit limiting in some ways but nevertheless it opened me up to the diverse ways we can manipulate light to produce a visually appealing image.


CONCLUSIONS

1.The diffuser produces a softer light which reduces areas of high contrast on the image.
2.The shiny surface of reflectors make a difference when it is put on the opposite side of the subject/object from the light.
2.High Contrast tends to produce more evocative and atmospheric images.
3.


THE LIGHTING ANGLE

Having worked out a manageable system for diffusing the light, we are now told to experiment with using it from different directions.So went ahead to set up an arrangement experimenting with different objects. I finally settled with some nice vases in my living room to see the effect of diffused light at different angles.

Image 1:Light in front of subject,ISO 1000,50mm,f/11,8s with tripod
Image 1 above shows some shadows to the left even with the diffuser.

Image 2:Light to the right of subject,ISO 1000,50mm,f/11,8.0s with tripod

With the light to the right of subject, the shadows on the vases appear to be sharper at the edges. I used auto white balance throughout because when i attempted using flash white balance, the images appeared to tainted orange in color. Maybe the color of light in the interior affected the result.


Image 3:Light to the left of subject,ISO 1000,50mm,f/11,10s with tripod
Image 4: Light behind the subject, ISO 1000,0ev,f/11,4s,with tripod,

With the image 4, i was supposed to get a silhouette which did'nt turn out so. It may possibly due to the flash power which i set at 1/128 based on the aperture and ISO i was using. I would need some now explanation from my instructor to help me get better at this next time. I know that to achieve a silhouette, the light meter is balanced with the brighter light and and the camera  re-directed to the dark area and then shutter is pressed. Thats now i have achieved silhouette before. But this one proved to be more challenging.


Image 5: Light behind subject to the left,ISO 1000,50mm,0EV,f/11,5s, with tripod

Image 6: Light behind subject to the right, ISO 1000,50mm,0EV,f/11,5s, with  tripod


Image 7: Light behind subject right at 45 degrees, ISO 1000,50mm ,f/11, 5s, with tripod
Image 8: Light behind to the subjects left at 45 degrees, ISO 1000,50mm,f/11,3s, with tripod


Image 9:Subject to the left of camera with side light at 45 degree angle: ISO 1000,50mm,f/11,2s, with tripod


Image 10: Subject to the right of camera with light at 45 degrees to the right: ISO 1000,50mm,f/11,2.5 with tripod


Image 11:Subject with light overhead pointing downwards: ISO 1000,50mm,f/11,2s with tripod

Image 12: Subject with light overhead slightly in front: ISO 1000,50mm,f/11,2.0 with tripod


Image 13: Subject with light overhead, Slightly behind.ISO 1000, 50mm,f/11,2s with tripod


22 June 2013

SOFTENING THE LIGHT

For these subsequent exercises that followed, I realised I needed some basic kits like light stands, tripods,diffusers, clamps, light sources and flash triggers. So i quickly bought some of these to continue with my projects. I  have been reading up on flash photography to understand the basics and how my speed light works. Initial attempts to use it proved to be frustrating.

In Understanding flash photography (Bryan Peterson,page 26), the following summary is made:

1. The aperture and only the aperture controls the amount of electronic flash light allowed to expose the picture.All flash exposures are 100% dependent on the right aperture being selected and the right flash to subject distance that corresponds to that aperture choice.

2. The shutter speed controls the amount that any ambient light is allowed to expose that same picture for which you are also using a flash.

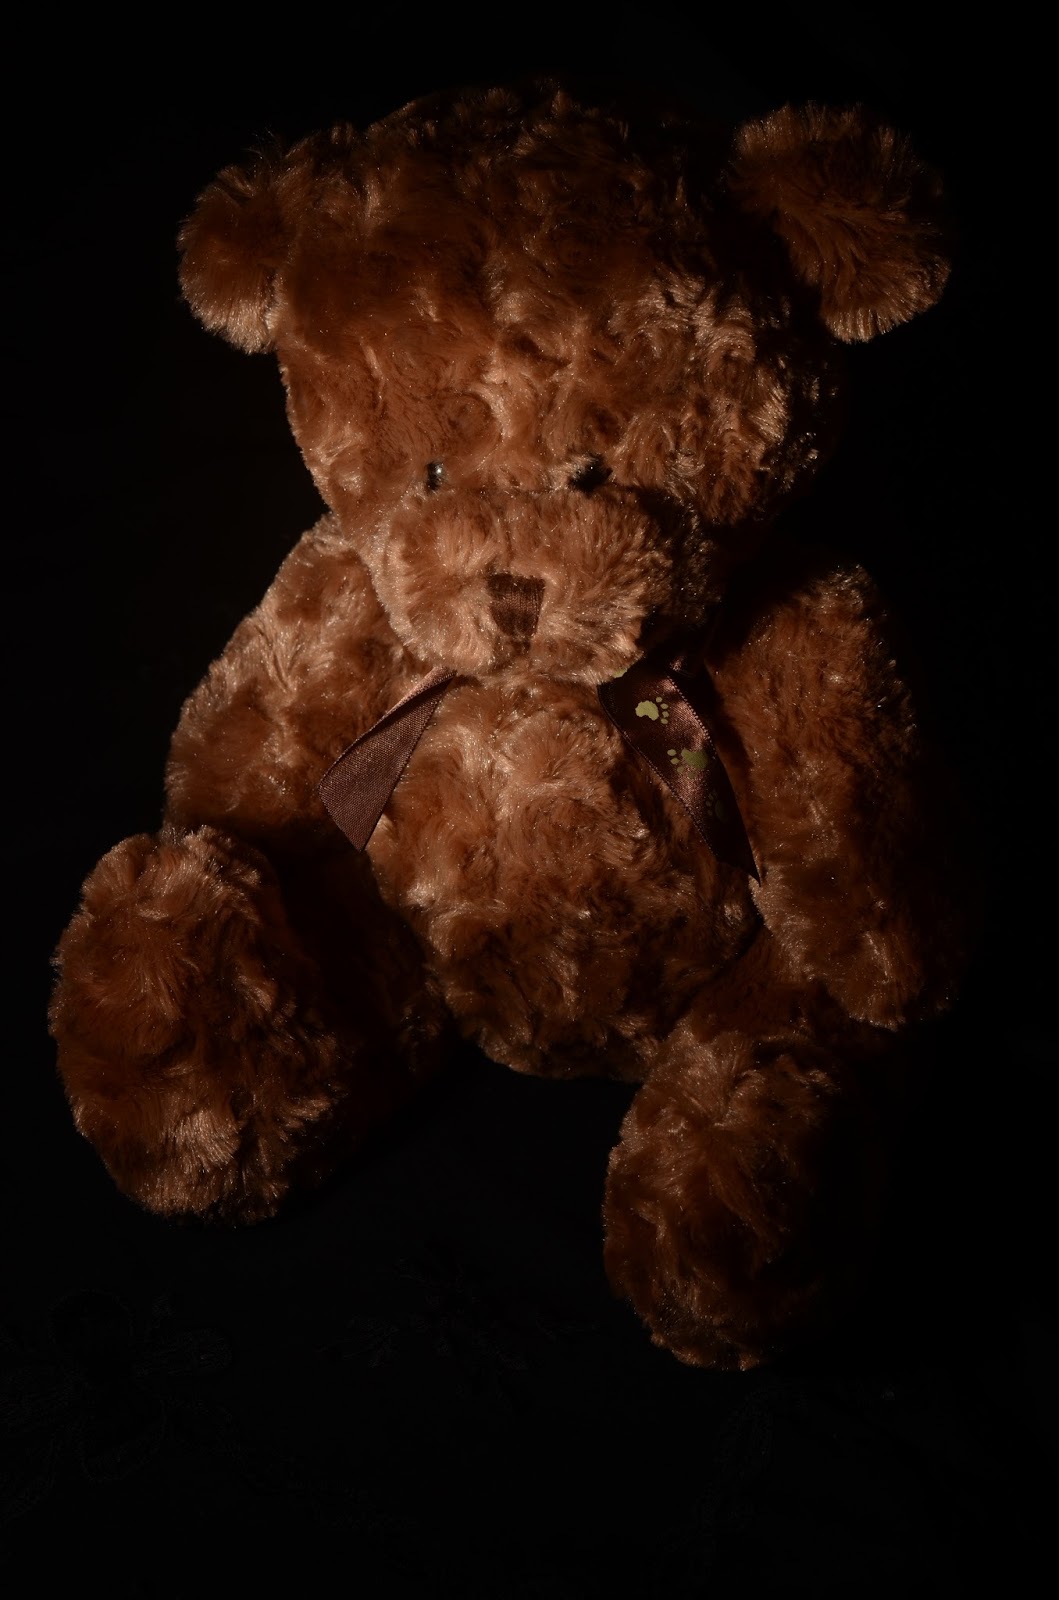
In this exercise,, I set up a still life arrangement and using the speed light as the source of light and the umbrella as a diffuser, took two pictures to show the effects with and without the diffuser.


Image 1:ISO 1600,50MM,0EV,F/8,1/6, NO DIFFUSER


Image 2:ISO 1600,50MM,0EV,F/8,1/6, WITH DIFFUSER


I shot handheld and therefore had to increase my ISO to 1600 to get a faster shutter speed. From image 1 , we see that the image has strong shadows since it was shot without a diffuser which was a white umbrella. But when i put in the diffuser between the light source and the object, the resulting image 2 shows less shadows. My speedlight gave me a flash to subject distance of 3.7 feet using ISO 1600 and an aperture of f/8. I reduced my flash power to 1/8.
Image 3: Sketch to show the camera's position

Image 4: My Set-up


I was pleased with the results though it took me a little while to figure out how to properly set it up. I think with a knowlegdge of how to manipulate artificial sources of light, the creativity in me will be ignited.


CONCLUSION:

1. Light from artifial sources can be modified to create pleasing effects in a photograph.

2. I  now understand the role played by diffusers to reduce or eliminate shadows in a photograph.

3. The diffusers employed in reducing shadows could range from soft boxes and umbrellas to the ones even attached to my speed lights.
4. The inverse square law plays an important role in the amount of light that falls on an object. It states that as the flash-to-subject distance doubles, the light reaching the subject is only 25% of the original light that left the source.


References: Peterson, Bryan: Understanding Flash Photography, Page 26.


09 June 2013

OUTDOORS AT NIGHT

The aim of the exercise  is to explore the variety of lighting effects and color in artificial light. Artificial light is used much less often by photographers than daylight and there are two distinct types. The first is available light used to illuminate buildings, streets and interiors that is not specially designed for photography. The second is photographic lighting which is the equipment that can be bought to create a lighting effect e.g flash light.(OCA Manual, Art of Photography, page 128.)

In doing this exercise, i seized an opportunity when i travelled to another town and stayed at the third floor of the hotel room to take some photographs of the view below at night. I set my camera on a tripod with a low ISO of 100 and my aperture wide open at f1.4 and took these shots.


Image 1: ISO 100,50MM,0EV,F/1.4, 1/2.5

The low shutter speed has made vehicle headlights and tailights to becomes light streams. I used a 50mm lens for this  but it may have been better accentuated with a zoom lens.

As i was doing this exercise, a nearby house erupted in fire and the bright glow lit up the horizon. While the fire service was been awaited after everone was evacuated , i took this shot below handheld at ISO 6400 which gave me a shutter speed of 1/125s using a 300mm lens.

Image 3:ISO 6400,300mm,0EV,f/9,1/125
Challenges of low-light photography include the use of a tripod and the time of day one would take pictures. But I quite like night time pictures and believe that with a little sacrifice it could be a rewarding past-time.  You have to understand how to expose properly for a subject at night. With apertures above 2.8 , you tend to get low shutter speeds which can be sensitive to the slightest camera shake , hence the need for a tripod. But if you raise the ISO setting on your camera, you may be able to get good shutter speeds to shoot handheld without having camera shake effect on the camera..However with raised ISO comes the problem of noise on the images. Some of the latest models DSLR's can produce sharp images at very high ISO,s eliminating the need to shoot with a tripod. But they can be quite expensive e.g the Nikon D4 which retails for $6000. But lower range cameras like the Nikon d7000 also do well at ISO's not exceeding 6400.

I got a hint of how to take good meter readings from Bryan Petersons Understanding exposures where he says that one raise his camera to the sky, get a balanced exposure, recompose and then press the shutter.This holds whether you are shooting in backlight, sidelight, front light, sunrise or sunset. If you need an ideal depth of field, set the aperture to f/16 or f/22.

Image 4:ISO 160,50MM,F/2,1/13
For the Image 4 above, I went to the local park for photo opportunities at night and came across the roasted meat seller. I composed to took a picture without any flash using my 50mm f1.4 lens.


Image 5:ISO 1600MM,80mm,f/13,1/80, A street Shop in Makka

In Image 5, I was attracted to the brightly lit store in a street in Makka, but i had no tripod and was instructed not to use one in my manual ,and so i increased the camera ISO to 1600 to get a faster shutter speed of 1/80s. The bright colors of the fabrics have given the shop some vibrance. Its dark in the corners and i know i could have done better getting a shot of the shop.


08 June 2013

BOOK REVIEW: UNDERSTANDING EXPOSURES BY BRYAN PETERSON

This book is the 3rd edition revised and updated which guides the reader on how to shoot great photographs with any camera.It begins with a discussion of what exposure means and then moves on to define the photographic triangle: Aperture, Shutter speed and ISO with the writer emphasizing the role each of these factors play separtely and intertwined to produce a good exposure. Each topic is defined by the page it is found inside the book rather than dividing it into chapters. From page 40, Aperture and depth of field are discussed in simple language that the reader will understand with clear pictures used as examples.

The importance of shutter speed is discussed in page 78 with emphasis on freezing motion, panning and implying motion.

From page 100, the writer talks about the importance of light in photography as well as the different types of light e.g front light,overcast light,sidelight and backlight.

The rest of the book deals with filters , special techniques and flash photography.

I bought this book from Waterstones in London in April 2011 and have found it to be a very important resource for my Photography. In fact the write-ups on light and types of light have been very useful in my understanding of this topic which am treating presently in my exercise.

I wholeheartedly would recommend the book to anyone interested in knowing more about exposures and light.